
TR520
Nowości » Inne
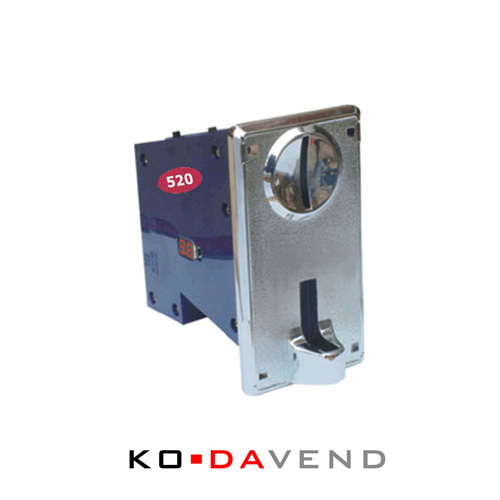
Specification:
- CPU system identify the coin's material, thickness and diameter
- can be programmed into maximum 5 vaIue channels for 5 different coins
- can study and memorize maximum 20 token/coin samples per vaIue channel
- control cable is selectable, which is used to enable/disable coin acceptor by electric level (critical voltage = 3V)
- counter cable is selectable to connect a counter (meter)
- Default interface logic is PULSE. The BYTE, RS232 & USB interface are available with different prices
- intelligent CPU auto recognize system Apply to coin diameter:18mm-29mm
- Apply to coin thickness:1.2mm-3mm
- work voltage: DC12V (+/- 20%)
- current in 50ma
- Net weight: 450grams/each
- CPU system identify the coin's material, thickness and diameter
- Include software guard system to prevent opportunistic behaviors
- Can connect the counter (meter)
- OPERATING MODE SWITCH can be set to N.O.(Normal Open) and N.C.(Normal Close)
- SPEED SWITCH can be set to fast-25ms, medium-45ms and slow-65ms
How To Set Up With The Coin Machine:
- Step 1: Switch to the correct operating mode of coin machine (normally N.O.)
- Step 2: Switch to the correct speed (pulse length) of coin machine (normally MEDIUM-45ms)
- Step 3: Connecting the +12V DC and Ground wiring for the coin Acceptor.
- Step 4: Set the mode-switch from "Start" to "Set" position, the LED light will show defualt "00", press the vaIue-adjustor to set the vaIue from "01-99" for the coins to be programmed (for example, set $1 coin as "01").
- Step 5: Prepare the needed sample coins.
- Step 6: Insert maximum 20pcs coins (for example, 20pcs of $1 coins) in turn for study (time interval 0.3 seconds). If less than 20 coins, can study more in future. After the memory of current vaIue channel is full, it will sound with three beeps.
- Step 7: Repeat step 4 to step 7 to program the next vaIue channel (for example, the channel of $2 coin), and maximum 5 channels can be programmed.
- Step 8: Turn the coin set switch to "Start" and finished the setting.
- Step 9: Set the sensitivity-switch from "NOM" to "MGN" position, then turn the mode-switch from "Start" to "Set" position, the LED show default "01", press the vaIue-adjustor to set the vaIue. "01-99" means how much the deposited coins vaIue should be added up to for a pulse signal output, and we call this accumulated vaIue as "signal output unit". For example - we set the vaIue of $1 coin & $2 coin as "01" & "02", and set the "signal output unit" as 03, a pulse signal will only be sent when the deposited coins added up to $3. Reposite the sensitivity-switch and mode-switch to finish the setting. Just skip this step if a pulse signal should be sent for each single vaIue of the programmed coins (i.e. - coin vaIue = number of signal output, for example, coin vaIue = "02" = 2 pulse signal output)
- Step 10: If need to cancel/clear the programmed parameters, return to step 4, and then press and hold vaIue-adjustor untill hear a long beep.
Packaging:
- Each piece packed into a small white box, size is W140 x D130 x H70 (mm)
- 30pcs packed into a carton, size is W420 x D380 x W300 (mm)
- CPU system identify the coin's material, thickness and diameter
- can be programmed into maximum 5 vaIue channels for 5 different coins
- can study and memorize maximum 20 token/coin samples per vaIue channel
- control cable is selectable, which is used to enable/disable coin acceptor by electric level (critical voltage = 3V)
- counter cable is selectable to connect a counter (meter)
- Default interface logic is PULSE. The BYTE, RS232 & USB interface are available with different prices
- intelligent CPU auto recognize system Apply to coin diameter:18mm-29mm
- Apply to coin thickness:1.2mm-3mm
- work voltage: DC12V (+/- 20%)
- current in 50ma
- Net weight: 450grams/each
- CPU system identify the coin's material, thickness and diameter
- Include software guard system to prevent opportunistic behaviors
- Can connect the counter (meter)
- OPERATING MODE SWITCH can be set to N.O.(Normal Open) and N.C.(Normal Close)
- SPEED SWITCH can be set to fast-25ms, medium-45ms and slow-65ms
How To Set Up With The Coin Machine:
- Step 1: Switch to the correct operating mode of coin machine (normally N.O.)
- Step 2: Switch to the correct speed (pulse length) of coin machine (normally MEDIUM-45ms)
- Step 3: Connecting the +12V DC and Ground wiring for the coin Acceptor.
- Step 4: Set the mode-switch from "Start" to "Set" position, the LED light will show defualt "00", press the vaIue-adjustor to set the vaIue from "01-99" for the coins to be programmed (for example, set $1 coin as "01").
- Step 5: Prepare the needed sample coins.
- Step 6: Insert maximum 20pcs coins (for example, 20pcs of $1 coins) in turn for study (time interval 0.3 seconds). If less than 20 coins, can study more in future. After the memory of current vaIue channel is full, it will sound with three beeps.
- Step 7: Repeat step 4 to step 7 to program the next vaIue channel (for example, the channel of $2 coin), and maximum 5 channels can be programmed.
- Step 8: Turn the coin set switch to "Start" and finished the setting.
- Step 9: Set the sensitivity-switch from "NOM" to "MGN" position, then turn the mode-switch from "Start" to "Set" position, the LED show default "01", press the vaIue-adjustor to set the vaIue. "01-99" means how much the deposited coins vaIue should be added up to for a pulse signal output, and we call this accumulated vaIue as "signal output unit". For example - we set the vaIue of $1 coin & $2 coin as "01" & "02", and set the "signal output unit" as 03, a pulse signal will only be sent when the deposited coins added up to $3. Reposite the sensitivity-switch and mode-switch to finish the setting. Just skip this step if a pulse signal should be sent for each single vaIue of the programmed coins (i.e. - coin vaIue = number of signal output, for example, coin vaIue = "02" = 2 pulse signal output)
- Step 10: If need to cancel/clear the programmed parameters, return to step 4, and then press and hold vaIue-adjustor untill hear a long beep.
Packaging:
- Each piece packed into a small white box, size is W140 x D130 x H70 (mm)
- 30pcs packed into a carton, size is W420 x D380 x W300 (mm)
Copyright © 2011 KO-DA VEND Dariusz Kosicki | www.automaty.sprzedajace.com | Powered by Quick.Cart